Creating Smaller Virtual Machines
Now that Virtual PC is finally free, I've become obsessed with producing the smallest possible Windows XP Virtual PC image. It's quite a challenge, because a default XP install can eat up well over a gigabyte. Once you factor in the swapfile and other overhead, you're generally talking about around 2-4 gigabytes for relatively simple configurations.
My best result so far, however, is a 641 megabyte virtual machine image of a clean, fully patched Windows XP install. Not bad. And here's how I did it.
First, start with the obvious stuff:
- Install Windows XP SP2. Take all default options.
- Connect to Windows update; install all critical updates.
- Install VM additions.
- Turn off system restore.
- Right click My Computer; select properties
- Click the System Restore tab
- Click the "Turn off System Restore" checkbox
- OK all the way back out
- Set Visual Effects to minimum.
- Right click My Computer; select Properties
- Click the Advanced tab
- Click the Performance Settings button
- Click the "Adjust for best performance" checkbox
- OK all the way back out.
- Shut down.
Don't install anything else yet! Remember, we're trying to get to a minimal baseline install of Windows XP first. A nice, flat platform to build on.
It's critical to turn off system restore, because that eats up hundreds of megabytes of disk space. In a virtual machine environment, having a rollback path doesn't make sense anyway. And if the Windows software environment wasn't so pathological, we wouldn't need complex rollback support embedded in the OS, either, but I digress.
Now let's put together our toolkit of virtual machine optimization:
- XPlite ($)
- Crap Cleaner
- TweakUI
- Whitney Defragger
- Invirtus VM Optimizer ($, optional)
Thes utilities are mostly free. And, except for Crap Cleaner, they don't even require installers. Just plop all the files for each one into a folder; I call mine VM-utils. Copy this folder to the target VM.
- Use TweakUI to turn on automatic login. Otherwise you have to distribute login credentials with your VM, and who wants to do that?
Now, use XPlite to tear out all the annoying, unnecessary bits of Windows XP:
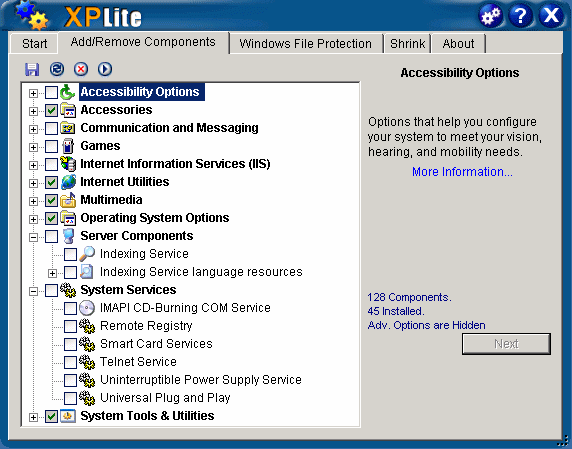
XPlite is easily the best utility of its type; it removes scads of useless things built into XP that have no explicit uninstall mechanism. Unfortunately, XPlite is payware. There is a free version, but it’s crippled; it can only remove a fraction of the items the full version can. See the full list of items it can remove along the right-hand side of the product page.
By default, XPlite generally shows things that are safe to remove. Note that the “Advanced Components” item is shown in that screenshot, which is definitely stuff that’s not safe to remove unless you really know what you’re doing. Anyway, here’s what I consider totally safe to remove in XPlite’s standard list:
- Accessibility Options
- Communication and Messaging
- Server Components
- Games
- System Services
The others require a bit of judicious selection.
- Accessories – you probably want Notepad, Calc, and the other essential applets. A world without Notepad is a world I don’t want to live in.
- Internet Utilities – if you want to keep the default IE6 inside XP, I’d leave this alone. With the notable exception of MSN Explorer, which is always safe to drop.
- Multimedia – if you have sound enabled, selectively keep some of this, otherwise dump it all. It’s highly unlikely you would ever want to watch videos or listen to music inside your VM, right? Right?
- Operating System Options – you may want to keep the core fonts if you’re planning to browse the web within the VM. Also, beware of removing the service pack update files. Most of this is safe to dump, though. However, you will need the VB6 runtimes for Crap Cleaner to run!
- System Tools & Utilities – I’d leave Dr. Watson, and possibly PerfMon, WSH and Zip folder support.
Once you’ve made your selections, let XPlite do its thing. It’s worth the effort, because you’ll have an unbelievably squeaky clean Start menu when it’s done. Who knew Windows XP could be this... simple?
- Install and run Crap Cleaner. Perform the default analysis, then do a cleanup. This step is really optional; it only cleans up a couple megabytes of log files and miscellaneous junk. Be sure to uninstall Crap Cleaner when you’re done, too.
-
Now that we’ve cleaned everything up, we need to defragment the disk.

You can use any defragmenter you like, of course, but this one is free and works quite well.
- Navigate to the folder where you put your VM utilities, including the Whitney Defragger.
- Open a command prompt
- Copy the defragmenting program to our windows system folder:
copy bootdfrg.exe c:windowssystem32
-
Install the defragmenting service:
defrag -i
- Schedule a defragmentation of the c: drive for the next boot:
defrag -d c: -B
- Restart the virtual machine.
- The defragmenter will run before Windows loads. Let it run to completion. It may take a little while, but it provides lots of textual feedback on what it’s doing.
-
Now we have to zero the free space on the drive. You have your choice of the free Microsoft Virtual PC Pre-Compactor, or the inexpensive Invirtus VM Optimizer. Both do the same thing, but the Invirtus tool results in an image that’s about 15 percent smaller (641 megabytes vs. 758 megabytes, in my test) than the Microsoft tool.
Either way, you’re mounting an ISO. The Microsoft Pre-Compactor is in a folder named “Virtual Machine Additions” under your Virtual PC install folder. Once mounted, the precompactor will autorun. Let it prep the drive; this doesn’t take long.
Cleanly shut down the virtual machine.
-
Finally, shrink the virtual machine hard drive using the disk wizard available from the Virtual PC UI:
- Click the File | Virtual Disk Wizard drop-down menu
- Edit an existing virtual disk
- Select the correct disk image
- Select “Compact it”
- Select “replacing the original file”
... and prepare to marvel at the tiny size* of the resulting hard drive image!
It’s really quite amazing how snappy and compact Windows XP can be, once you remove all the useless cruft from it.
*That’s what she said.