Building a PC, Part III – Overclocking
Now that we have Scott Hanselman’s computer completely built up and stable – or at least that’s what our torture tests told us yesterday – it’s time to see how far we can overclock this system.
Overclocking a computer sounds complicated, but it really isn’t. We’ll use four tools:
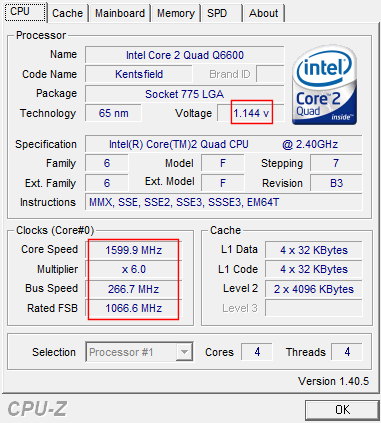
While overclocking, CPU-Z will become your new best friend. It tells us exactly what’s happening inside our PC. Let’s start with a shot of CPU-Z showing the stock settings for this Core 2 Quad 6600.
 |  |
The left side is idle, and the right side is under load. Notice how the system automatically and dynamically adjusts the multiplier and voltage (the areas highlighted in red) to reduce power consumption. On the Intel platform, this technique is known as EIST, Enhanced Intel SpeedStep Technology.
First, a little basic math. This Core 2 Quad is clocked at 2.4 GHz, or 2400 MHz. The CPU speed is a function of the front side bus speed times a multiplier.
| Bus Speed | Front Side Bus Speed | Multiplier | CPU Speed | |
| 266 MHz | 1066 MHz | x9 | = | 2400 MHz |
| 266 MHz | 1066 MHz | x6 | = | 1600 MHz |
| 333 MHz | 1333 MHz | x9 | = | 3000 MHz |
As you can see, increasing the front side bus speed from 266 MHz to 333 Mhz increases the speed of the CPU. It’s also theoretically possible to increase the CPU’s speed by changing the multiplier, but Intel locked down multiplier changes years ago at the silicon level. So the only way to increase the CPU’s speed is to increase the front side bus speed. (There are exceptions, but they’re rare.)
Armed with that knowledge, let’s go into the BIOS (by pressing DELETE while the system is booting) and start adjusting the CPU’s speed. On the MSI P6N, the CPU speed options are tucked away under a menu titled “Cell Menu.” This varies from BIOS to BIOS, but the gist of the settings is the same.
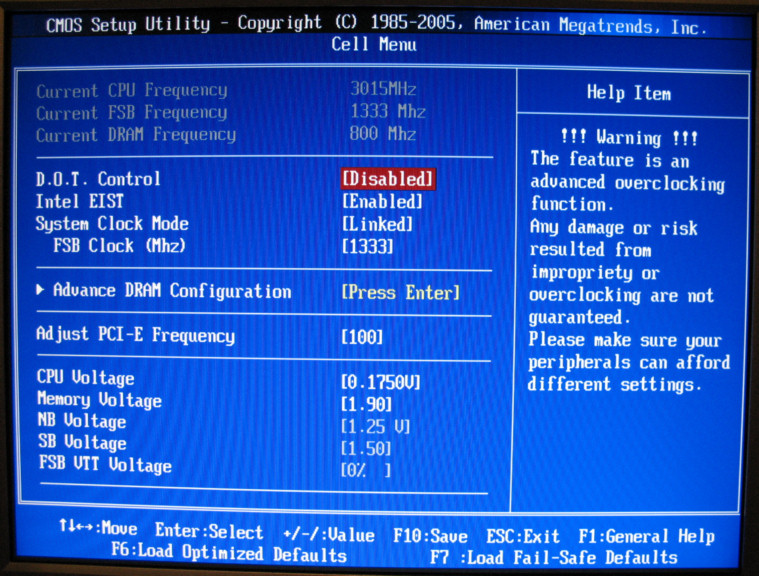
I covered overclocking briefly last year when I built my last home computer. The principles are still the same. To overclock, we simply bump up the front side bus speed from 1066 MHz to something larger. To give ourselves additional headroom for overclocking, we also need to bump up the memory and CPU voltages a tad.
Note that this particular motherboard allows me to overclock the CPU front side bus independently of the memory front side bus. The memory bus speed is expressed as a ratio of the FSB, e.g., 5:4 or 3:2. Modern motherboards offer a wide range of ratios, so almost any memory bus speed is achievable within a few MHz. I had terrible results overclocking the memory in this system, so the memory is staying locked at its stock 800 MHz speed.
Successful overclocking is a game of inches, not yards. Start small. Increase voltage slightly and the FSB slightly, then reboot. Remember – we started from a stable system. If your system shows any sign of instability, no matter how small, you’ve definitely overclocked too far.
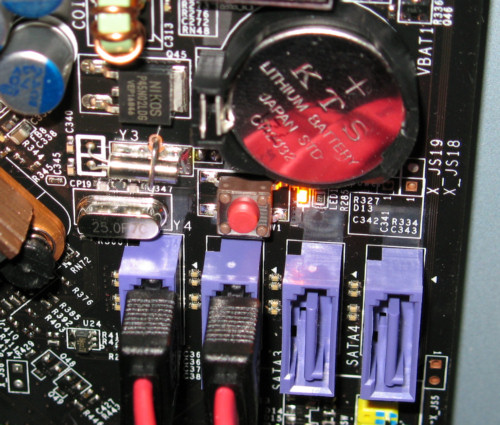
And if your system fails to boot, or if you can’t enter the BIOS to set things back, don’t fret. This is why vendors include the “reset CMOS” function on the motherboard. On the MSI P6N, it’s a small button; on other motherboards it’s a jumper. If all else fails, you can also pop out the CMOS battery and let the system sit for a minute or so. That’ll definitely clear the BIOS settings. However, make sure you disconnect the power before clearing the CMOS.
If you successfully boot into Windows, that doesn’t mean your overclock is stable. You have to run Prime95 torture test for at least an hour to see if things are truly working, and ideally overnight to be completely sure.
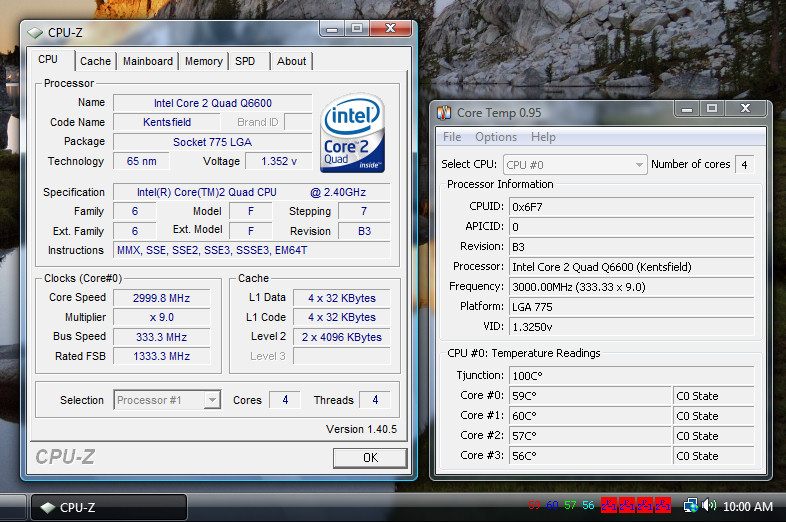
Overclocking ability varies widely per sample of CPU and even per motherboard. Some overclock well, some don’t. It’s largely the luck of the draw, although most Core 2 chips have reputations as solid overclockers for good reason. The Core 2 Quad Q6600 and MSI P6N combo in this system were able to deliver a successful overclock from 2.4 GHz to 3.0 GHz, as shown in this CPU-Z screenshot:

But is it stable? I ran four instances of Prime95 torture test, alongside CoreTemp to make sure the CPU temperatures stayed under control. CPU temperatures are the enemy of speed – all other things being equal, the higher the CPU temperature, the less likely it is your system will be stable. (This is also why extreme overclockers use water cooling and liquid nitrogen.) That’s one reason why we have a fancy aftermarket CPU cooler.
Once the torture test is running, you can minimize Prime95. The taskbar icon should stay red if things are working properly. If you see a yellow icon, that means Prime95 bombed out and your overclock isn’t stable.
After a few hours of heavy Prime95 load on each core, I was satisfied that the system was nominally stable.
Here are the benchmark results reflecting the newly overclocked CPU:
| Stock | Overclocked | |
| 3DMark2006 (@1024x768) | 7217 | 7398 |
| PCmark2005 | 7353 | 8432 |
Yes, overclocking is a lot of manual effort, a lot of tedious trial and error tweaking. Is the risk of instability and all that effort worth it for a tiny speed bump? Why bother? Well, judge for yourself:
| Core 2 Quad Q6600 (stock) | 2.40 GHz | $480 |
| Core 2 Extreme QX6800 | 2.93 GHz | $1,345 |
| Core 2 Quad Q6600 (overclocked) | 3.0 GHz | $480 |
I’d say saving nearly a thousand bucks is a pretty good argument in favor of overclocking.