
Building a PC, Part VI: Rebuilding
I can’t believe it’s been almost two and a half years since I built my last PC. I originally documented that process in a series of posts:
- Building a PC, Part I: Minimal boot
- Building a PC, Part II: Burn in
- Building a PC, Part III: Overclocking
- Building a PC, Part IV: Now It’s Your Turn
- Building a PC, Part V: Upgrading
Now, lest you think I am some kind of freakish, cave-dwelling luddite, what with my ancient two and a half year old PC, I have upgraded the CPU, upgraded the hard drive, and upgraded the video card since then. I also went from 4 GB of RAM to 8 GB of RAM, but I didn’t happen to blog about that. Normal computers age in dog years – every year they get seven years older – but mine isn’t so bad with all my upgrades! I swear!
Judge for yourself; here’s a picture of it.
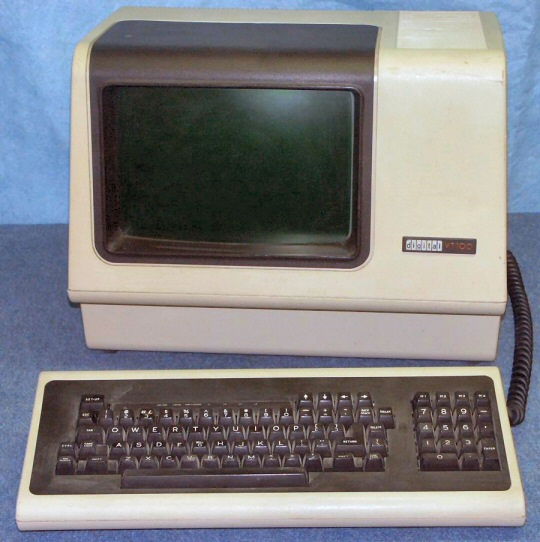
But seriously.
A big part of the value proposition of building your own PC is upgrading it in pieces and parts over time. When you’re unafraid to pop the cover off and get your hands dirty with a little upgrading, you can spend a lot less to stay near the top of the performance heap over time. It’s like the argument for buying a car versus renting it; the smart buyers keep the car for as long as possible to maximize the value of their investment. That’s what we’re doing here with our upgrades, and a rebuild is the ultimate upgrade.
In defense of my creaky old computer, the Core 2 series from Intel has been unusually strong over time, one of their best overall platforms in recent memory. It was almost good enough to banish the excrable Pentium 4 series from my mind. Man those were horrible! But the Core 2 series was a solid design with some serious legs; it and scaled brilliantly, from single to dual to quad core, and in frequency from 1 GHz to 3.5 GHz.
I was initially unimpressed with the new Core i7 architecture that Intel launched to replace the Core 2. While the new Nehalem architecture is a huge win on servers, it’s kind of “meh” on the desktop. I have endless battles with overzealous developers who swear up and down that they use their desktops like servers. Sure you do! And you’re building the space shuttle with it, right? Of course you are. Yeah.
Meanwhile, back on Planet Desktop, there were some other reasons that I started thinking seriously about upgrading from my overclocked Core 2 Duo to a Core i7 upgrade:
- The Core i7 platform uses triple channel DDR3 memory. While the benefits of the additional bandwidth are somewhat debatable on the desktop (as usual), one interesting side-effect is that motherboards have 6 memory slots. While 16 GB is theoretically possible on Core 2 systems, it required extremely expensive 8 GB DIMMs. But with 6 memory slots, we can achieve 12 GB without breaking the bank – by using six 2 GB DIMMs.
- The Core i7 is Intel’s first “real” quad-core architecture. Intel’s previous quad core CPUs were basically two dual core CPUs duct taped together on the same die. No such shortcuts were taken with the i7. While the difference is sort of academic, there are some smallish real world performance implications.
- Mainstream software is finally ready for quad core CPUs. It’s not uncommon today to find applications and games that can actually use two CPU cores reasonably effectively, and those that can use four or more cores are not the extreme rarity they used to be. Don’t get me wrong, scaling well to four or more CPU cores is still rare, but it’s no longer spit-take rare.
- Intel introduced the mainstream second generation Core i5 series, so the platform is fairly mature. All the new architecture bugs are worked out. It’s also less prohibitively expensive than it was when it was when it was introduced.
At this point, I had the seven year upgrade itch really bad. My 3.8 GHz Core 2 Duo with 8 GB of RAM was not exactly chopped liver, but I started fantasizing a lot about the prospect of having a next generation quad-core CPU (of similar clock speed) with hyperthreading and 12 GB of RAM.
If you’re wondering why I need this, or why in fact anyone would need such an embarrassment of desktop power, then I’ll refer you to my friend Loyd Case.
Don’t ask me why I need six cores and 24GB. To paraphrase a Zen master, if you have to ask, you do not know.
Loyd has indirectly brought up another reason to choose the i7 platform; it’s pin-compatible with Intel’s upcoming “Gulftown” high end 6-core CPU. So, your upgrade path is clear. (It’s also rumored that the next iteration of the Mac Pro will have two of these brand new 6-core CPUs, before any other vendor gets access to them, which is totally plausible.)
As far as I’m concerned, until everything on my computer happens instantaneously, my computer is not nearly fast enough. Besides, relative to how much my time costs, these little $200-$500 upgrades to get amazing performance are freakin’ chump change. If I save a measly 15 minutes a day, it’s worth it. As I like to remind pointy-haired managers all over the world, Hardware is Cheap, and Programmers are Expensive. OK, maybe I’m biased, but the conclusion was overwhelmingly clear: it’s UPGRAYEDD time!

This is a more than an upgrade, though, it’s a rebuild – a platform upgrade. That means I’ll be assembling the following...
- new Motherboard
- new RAM
- new CPU
- new heatsink
... and dropping that into my existing system, which is highly optimized for silence. The case, power supply, hard drives, DVD-R, etc. won’t change. On the outside, it’ll look the same, but on the inside, it’s a whole new PC. This is analogous to replacing the engine in a sports car, I suppose. On the outside, it will appear to be the same car, but there’s a lot more horses under the hood.
As I said in the first part of my building your own PC series, if you can assemble a LEGO kit, you can build a PC.
Take your time, be careful, and go in the right order. So, first things first. Let’s assemble the CPU, heatsink, and memory on the motherboard – in that specific sequence, because modern heatsinks can be a pain to attach.
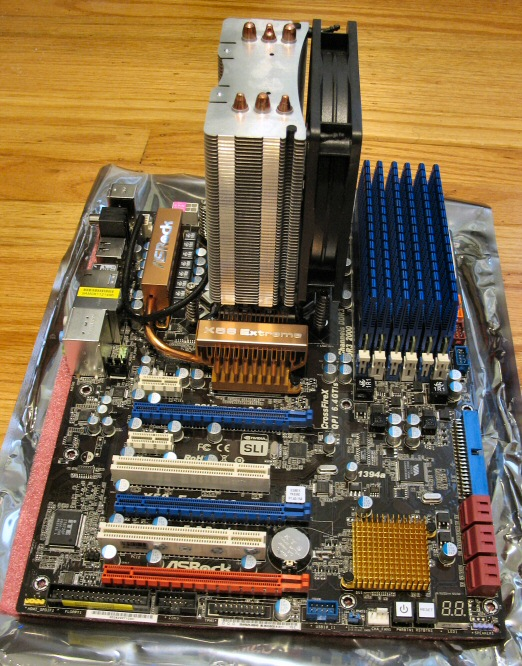
Man, check out at all that hot, sweet, PC hardware! I get a little residual thrill just cropping the picture. Love this stuff! Anyway, that gives us a mountable motherboard with all the important bits pre-installed:
- ASRock X58 Extreme motherboard ($169)
Inexpensive, has all the essential features I care about, and is recommended by Tom’s Hardware. I’m not into fancy, spendy motherboards; I think they’re a ridiculous waste of money. - XIGMATEK HDT-S1283 cooler ($35).
Direct contact between the CPU cooler heatpipes and the CPU surface is the new hotness, or rather, coolness. It really works, since all the top performing CPU coolers use it now. This one is fairly inexpensive at $35 and gets great reviews. Also, I highly recommend the optional screw mount kit ($8). Modern CPU coolers are large, and the mounting mechanism needs to be more solid than plastic pushpins. - Kingston HyperX 4GB (2 x 2GB) DDR3 2000 ($135) ×3
I’ve had good luck with Kingston in the past. I went with their semi-premium brand this time, as I plan to do a bit of overclocking and the price difference is fairly small. Remember, this is a 12 GB build, so we’ll need three of these kits to populate all 6 memory slots on the motherboard. - Intel Core i7-960 3.2 GHz CPU ($590)
While you could make a very solid argument that the Core i7-920 CPU ($289) is a better choice because it’s identical and overclocks to the same level, I was willing to spend a bit more here as “insurance” that I get to the magical 3.8 Ghz level that my old Core 2 Duo was overclocked to.
update: since a few people asked, here are my case and power supply recommendations.
- Antec P183 Black Computer Case ($140)
I used the older P180/P182 Antec case in my original series; it’s still one of my favorites. This version brings some much needed improvements to airflow to accommodate higher power CPUs and video cards, as documented in a recent Silent PC review article. - CORSAIR CMPSU-650HX 650W Power Supply ($120)
You don’t want to skimp on the power supply, but there’s no need to spend exorbitant amounts, either. Forget the wattage rating and look at the quality. Corsair is known for very high quality power supplies. The HX series is a bit more, but has modular cables, which makes for a cleaner build.
It adds up to about $1000 all told. A rebuild is definitely more expensive than one-off upgrades of CPU, memory, and hard drive. But, remember, this is a rebuild of my PC – and a fire-breathing, top of the line performance rebuild at that. That takes spending a moderate (but not exorbitant) amount of money.
Now that we’ve got all that stuff assembled, the next thing to do is open my existing PC, disconnect all the cables going to the motherboard, temporarily remove any expansion cards, unscrew the motherboard and lift it out.

Once the old motherboard assembly was pulled out, I plopped in the new motherboard, screwed it down, and reattached the cables and expansion cards. Don’t close up the PC at this point, though. Before powering it on, double check and make sure all the cables are reattached correctly:
- Power cables from the PSU to the motherboard. There are usually at least two, on modern PCs.
- Hard drive cables from the HDDs to the motherboard.
- Power switch, Reset switch, Activity light cables. Without the power switch connected, good luck powering up. This motherboard happens to have built-in power and reset switches for testing, but most don’t.
- Fan connectors from the Heatsink and case fans to the motherboard.
- Power cables from the PSU to the video card, if you have a fancy video card.
If anything is wrong, we’ll just have to re-open the case again. On top of that, we need to monitor temperatures and airflow, and that’s much easier with the case open.
Fortunately, my rebuild booted up on the first try. If you’re not so lucky, don’t fret! Disconnect the power cord, then go back and re-check everything. I get it wrong, sometimes, too; I actually forgot to reconnect the video card power connectors, and was wondering why only the secondary video card was booting up. Once I re-checked, I immediately saw my mistake, fixed it, and rebooted.
Once you have a successful boot, don’t even think about booting into the operating system yet. Enter the BIOS (this is typically done by pressing F12 or Delete during bootup) and check the BIOS screens to make sure it’s detecting your hard drives, memory, and any optical drives successfully. Browse around and do some basic reality checks. Then do not pass GO, do not collect $200, go straight to your motherboard manufacturer’s website and download the latest BIOS. On another computer, obviously. Most modern motherboards allow updating the BIOS from a USB key, so just copy the BIOS files on the USB key, reboot, and use the BIOS menus to update. After you’ve updated the BIOS, set BIOS options to taste, and we’re finally ready to boot into an operating system.
While this may sound like a lot of work, it really isn’t. All told it was maybe an hour, tops. I’m fairly experienced at this stuff, but it’s fundamentally not that complicated; it’s still just a very fancy adult LEGO kit.
Courtesy of this $1000 rebuild, my ancient 2.5 year old PC is reborn as a completely new state-of-the-art PC, at least internally. That was always part of the plan! Next up – once we’ve proven that it’s stable in typical use – overclocking, naturally. I’ll have more on that in a future blog post, but I can tell you right now that Core i7 overclocking is... interesting.


