
Building and Overclocking a Core 2 Duo System
It’s been over a year since I built my last PC, and all those killer Core 2 Duo benchmark and overclocking results were making me anxious. I just pulled the trigger on the following Core 2 Duo upgrade:
- ASUS P5B Deluxe motherboard, $195
- A-DATA 2GB DDR2 667 memory, $199
- Core 2 Duo E6600 CPU, $318
- Scythe Infinity heatsink, $58
I’m not replacing my video card, hard drive, power supply, or case. This is a straight “drop in” replacement for my existing Athlon X2 4800+.
First, a few words on why I chose these specific parts. Computer hardware is one of my few indulgences, but I do a freakishly obsessive amount of research before buying anything. Allow me to share my freakish obsession with you, dear reader. After all, that’s what the internet is for.
- Motherboard. The 965 Express was an editors’ choice at Tech Report. It’s the most modern chipset for the Core 2 Duo, too. ASUS is a well respected brand name, and I really like the fact that it has a silent heat pipe on the northbridge instead of a fan. Modern northbridges run very hot, and cooling them quietly can be a PITA because of their proximity to the CPU and video cards.
- Memory. Fast DDR2 memory ain’t cheap. And I won’t go below 2 gigabytes, which is what I consider a mainstream memory configuration these days. Have you priced 2 gigabytes of DDR2-1066 lately? Personally, I think buying extremely fast memory is overrated; by the time the system has to reach beyond the L1 and L2 cache into main memory, the performance penalty is already so severe that a few additional nanoseconds isn’t going to matter in the big scheme of things. That’s why I went with a nice midrange DDR2-667, specifically the AData Vitesta memory which did quite well in a recent AnandTech value memory roundup. Even if you push the front side bus up to 400 MHz – what I consider an extreme overclock – that’s still only (400 x 2) or DDR2-800 officially. And all the value DDR2-533 memory AnandTech tested ran fine at 800 speeds, as long as you bumped up the voltage a bit.
- CPU. Core 2 Duo is clearly the benchmark champ at the moment. I’ve been a long time AMD enthusiast, but Intel finally abandoned the problematic Pentium 4 architecture and built a better mousetrap this time. The E6600 is the cheapest Core 2 Duo with 4 megabytes of level 2 cache. I’m a big believer in cache, so I’m not willing to drop down to the E6300 or E6400 which only have 2 megabytes of L2. This might be a little irrational if you actually compare the performance of both cache sizes on an apples-to-apples clock rate basis, but so be it. I loves me some L2 cache.
- Heatsink. If you want a quiet PC, buy the best CPU heatsink you can afford. That said, the Scythe Infinity is definitely overkill for a Core 2 Duo system, even an overclocked and overvolted one. But it’s such beautiful, magnificent, glorious overkill. It barely fit in my case. That just made me love it all the more. This monster barely gets warm under dual Prime95 load. Running it completely passive is a no-brainer, but make sure you have proper case airflow.
My general strategy with computer upgrades is to buy upper midrange and overclock myself into high-end territory for extra value. The Core 2 Duo CPU makes this easy, because they’re all incredible overclockers. I overclocked my $319 2.4 GHz E6600 chip beyond $999 Core 2 “extreme” X6800 territory with a few quick modifications in the BIOS:
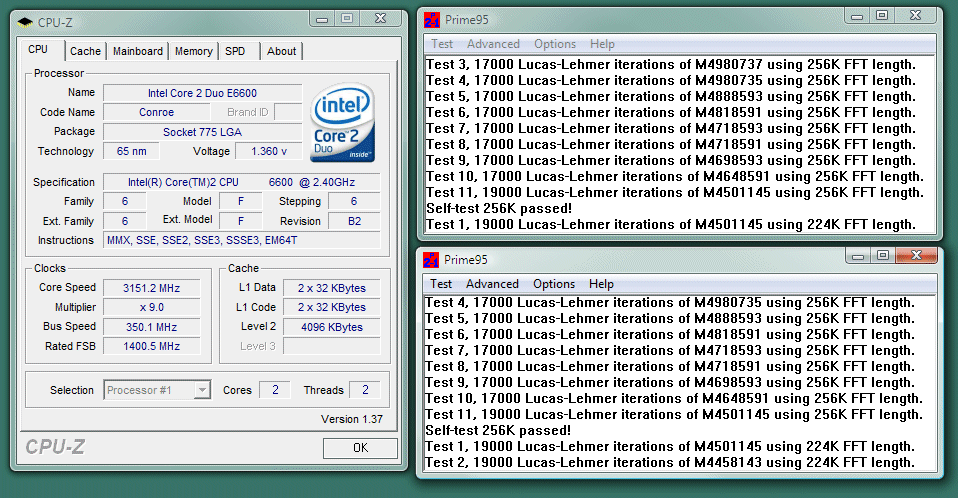
As a responsible overclocker, I also ensure the system is actually stable at these settings through hours and hours of Prime 95 torture testing. I still have those two instances of Prime95 running in the background as I’m writing this post.
So how did I turn my 90-pound weakling of a $320 CPU into a fire-breathing $999 monster CPU? It’s quite easy. Read on.
- Install the latest BIOS on the motherboard. This is standard operating practice whenever I build a new system. On the P5B, the flash utility is built into the BIOS and it even supports USB flash drives! Finally! I downloaded the latest P5B Deluxe BIOS from ASUS’ web site, copied it on a flash drive, plugged it in. I then booted, pressed ALT+F2 during startup to access the flash utility, and it autodetected the new BIOS file. All I had to do was hit enter to start the BIOS update, and I was done.
- Slowly increase the FSB speed in the BIOS. I have an E6600, which is a 2.4 GHz chip with a 9x multiplier. That means the FSB speed is 2400 / 9 or 266 MHz. As I increase the FSB speed, the CPU speed also increases. I first tried 333 MHz, which results in 333* 9 or 3.0 GHz. As you can see in the screenshot, I’ve currently gone a bit further for 3.15 GHz. Remember, make small changes and test as you go. Don’t immediately go for the highest possible overclock. Be conservative initially; you can adjust upward more later after you develop confidence.
- Increase voltage to the CPU, and memory in the BIOS. To goose that extra bit of performance out of your system, increase voltages in the BIOS across the board. Don’t worry, I’m not talking about massive increases here – just slight boosts. I’m using 1.425 volts for the CPU (up from 1.35v), and 2.1 volts (up from 1.8v) for the memory. If what you want to do doesn’t work with these modest voltage boosts, it probably won’t work at all.
- Boot and see what happens.
- My computer won’t boot. Don’t worry. No harm, no foul. Unplug your system, find the clear CMOS jumper on your motherboard, and use it to clear the CMOS. You can also pop out the CMOS battery if you’re impatient. Make sure you do this with the system unplugged, and give the system a full minute to clear the CMOS.
- I can’t boot into my operating system. Your overclocking settings are too aggressive. We already increased voltage, so you need to back down your overclocking settings in the BIOS.
- It works! Maybe it does, maybe it doesn’t. Don’t get cocky. See next step.
- Burn your new settings in with Prime95. Assuming you booted and logged into your operating system without crashing, hanging, or bluescreening*, your next job is to run torture tests to see if things are really working. Prime95 is your new best friend. You’ll run one instance for every core in your CPU – create a copy of the Prime95 folder for each core, and run the executables from those folders. Use Options, Torture Test, “In place large FFT” to start. If you can run Prime95 this way for an hour, it’s very likely your system is stable. If you can run Prime95 this way overnight, your system is guaranteed stable.
Now that I’ve gotten my Core 2 Duo system stable at 3+ GHz, I can bask in the glory of a system that’s 50% faster than my old Athlon X2 4800+ – at least according to SYSmark 2004. Not bad for under 800 bucks.
*Sounds traumatic, but if you want to make an omelette, you have to break some eggs. Don’t be afraid to break stuff.


